


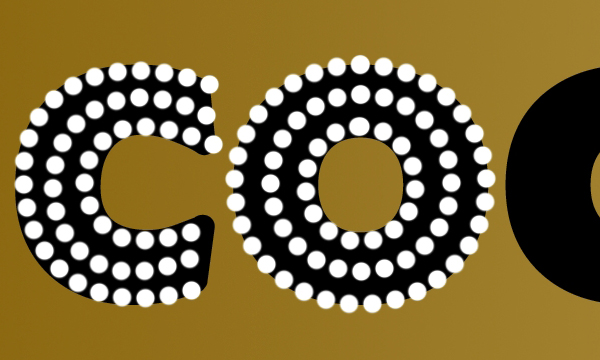
This Photoshop tutorial
explains how to design a three-dimensional text, which consists of dots and a
blurred extension.
Final Image Preview

Step 1
Create a new document,
1600px for the width and 1000px for the height. Set the Foreground color to
#8a5a01, and the Background color to #ba9145, then drag a Linear Gradient from
left to right. You can choose your own colors as well, or add an adjustment layer
to change the colors as shown in the end of this tutorial.

Open the Brush panel
(Window -> Brush), and modify the Brush Tip Shape settings as shown below:

Create the text using
the font BorisBlackBloxx, and the Size of 400 pt.

Use the Pen Tool, and
make sure to click the Paths icon in the Options bar, to draw a curve in the
middle of the first letter. Add the main anchor points, you can modify them
later.

If you think that the
curve needs more anchor (control) points, you can always add ones using the Add
Anchor Point Tool.

Then, you can use the
Direct Selection Tool to click and drag the curve’s anchor points or the
direction lines.

Step 2
Create a new layer on
top of of all layers, and with the Pen Tool still active, right click on the
path and choose Stroke Path.

Choose Brush from the
Tool drop down menu and make sure that the Simulate Pressure box is un-checked.

This will stroke the
path with the modified brush. Hit Enter to get rid of the path.

Create a new path near
the inner edge of the letter, and stroke the path on a new layer.

Do the same for the
outer edge as well. You will end up having three layers, one for each stroke.

Repeat the same process
for the remaining letters. You can use custom shapes instead of drawing the
curves when possible (like using the Ellipse Tool, with the Paths icon in the
Options bar clicked, for the O letter).

Remeber to stroke the path on a separate layer each time.

You can duplicate any
layers for the same letters.
Once you’re done, each
letter will have 3 layers covering it with dots.

Step 3
Make the original text
layer invisible (by clicking the eye icon next to it), because we don’t need
it.

Select all the Dots
layers, then go to Layer -> Merge Layers (Ctrl + E) to merge them in one
layer, and call it “Merged Dots”.

Use the Erase Tool to
get rid of any dots that are not aligned with the others.

Make sure that the
“Merged Dots” layer is active (selected), then go to Select -> Load
Selection. Choose the “Merged Dots Transperancy” Channel. This will select the
layer’s contents (the dots).

Pick the Gradient Tool,
and choose the Spectrum Gradient. Create a new layer on top of all layers and
call it “Gradient”, then fill the selection with the gradient.

Make the “Merged Dots”
Layer invisible.

Step 4
Go to Edit ->
Transform -> Perspective, and move the corners as shown below. You can
transform the text as you like for now, and you can do that again anytime you
think the text needs more perspective later on. Once you’re done hit Enter.

Pick the Lasso Tool,
and create a selection around the first letter, then press Ctrl + J to
duplicate it in a separate layer. Rename that layer to the letter it contains.

Repeat the same for the
other letters. Once you have a layer for each letter, make the “Gradient” layer
invisible.

Step 5
Duplicate the first
letter’s layer.

Go to Filter -> Blur
-> Motion Blur, and set the values as shown below:

Make four duplicates of
the copy layer.

Merge the “copy”
layers, and move them below the original letter’s layer.

Go to Edit ->
Trasform -> Perspective, and transform the merged “copy” layer to make the
blurred part look like an extension of the original letter.

Erase the blurred parts
to the left.

This is what you should
get. You can make the other letters layers invisible if you like.

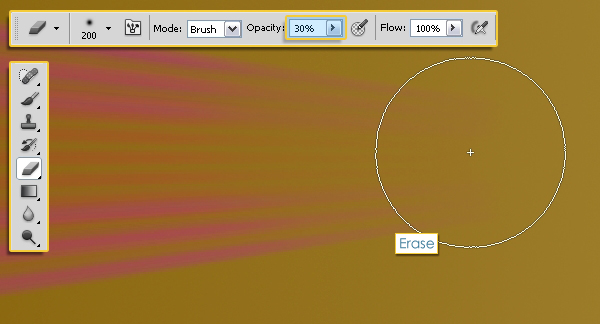
Pick the Blur Tool, and
change the Options bar settings as shown below, then blur the lateral part of
the extension.

Use a soft brush with
an Opacity value of 30% to slightly erase the end of the extension, so that it
looks feathered out.
Repeat the same steps
for each letter.

Step 6
Merge the original
letters layers in one layer and rename it to whatever text you have.

Duplicate each one of
the extension layers to make them more vivid.

Duplicate the merged
letters’ layer (cool), and drag the copy layer below the original one.

Go to Filter -> Blur
-> Gaussian Blur, and enter 2.5 for the Raduis.

Step 7
Create a new layer
right on top of the Background layer and call it “Shadow”. Set the Foreground
color to #634016, and use a soft round brush (500 px) to paint a shadow below
the text.

Go to Filter -> Blur
-> Gaussian Blur and enter 20 for the Raduis.

Change the “Shadow”
layer’s Blend Mode to Multiply and its Opacity to 70%.

If you want you can
select all the visible layers (except for the Background), then go to Edit
-> Transform -> Perspective, and rotate the text even more.

Step 8
If you’d like to change
the Background colors to add more contrast, then select the Background layer,
and click the Create new fill or adjustment layer down the Layers panel, then
choose “Hue/Saturation”.

Change the Values as
shown below:

Once again, click the
Create new fill or adjustment layer, but choose “Levels” this time. Change the
values as shown below:

Finally, select the
“Shadow” layer once again, then go to Image -> Adjustments ->
Hue/Saturation, and change the Saturation value to to -100 (to match the new
Background colors).

Final Image


0 comments:
Post a Comment